About 8 years ago, I organised one of the Welsh XC Rounds near to Brecon. After the race, while walking the course to retrieve the race signage, I found a short piece of carbon bar with a partially mangled bar-end attached to it, presumably where some unfortunate racer had collided with a tree. In much you same way as you find odd shoes around the countryside, you’d think one bar-end wouldn’t be useful to anyone, but I picked it up anyway and took it home where it lay in the bottom of my “bits and pieces” box ever since.
Back to the present day, I’ve been thinking for a while about how to charge electronic devices while on long bikepacking trips. Having acquired both a dynamo hub and an Exposure Revo, I’ve been happily enjoying not having to charge my light batteries all winter. But, during the day when you don’t necessarily need your lights off road, you could be putting all the energy generated by your hub into something else, like a buffer battery or, via a Cycle2Charge, direct into a GPS/Spot/Phone. (more…)
How embarrassing. It’s nearly six months since I posted something here.
You will, perhaps, be pleased to see that I’m still alive and if you cast your eyes rightwards towards to the twitter feed, things have indeed been happening. Finding the time to write more than 140 characters has been more of a challenge, and even up to 140 has been a stretch at times.
I do sometimes lack the inspiration to write something interesting, and try not to blog for the sake of blogging, but Taylor said he was getting tired of looking at that stove review, so it’s time for something else.
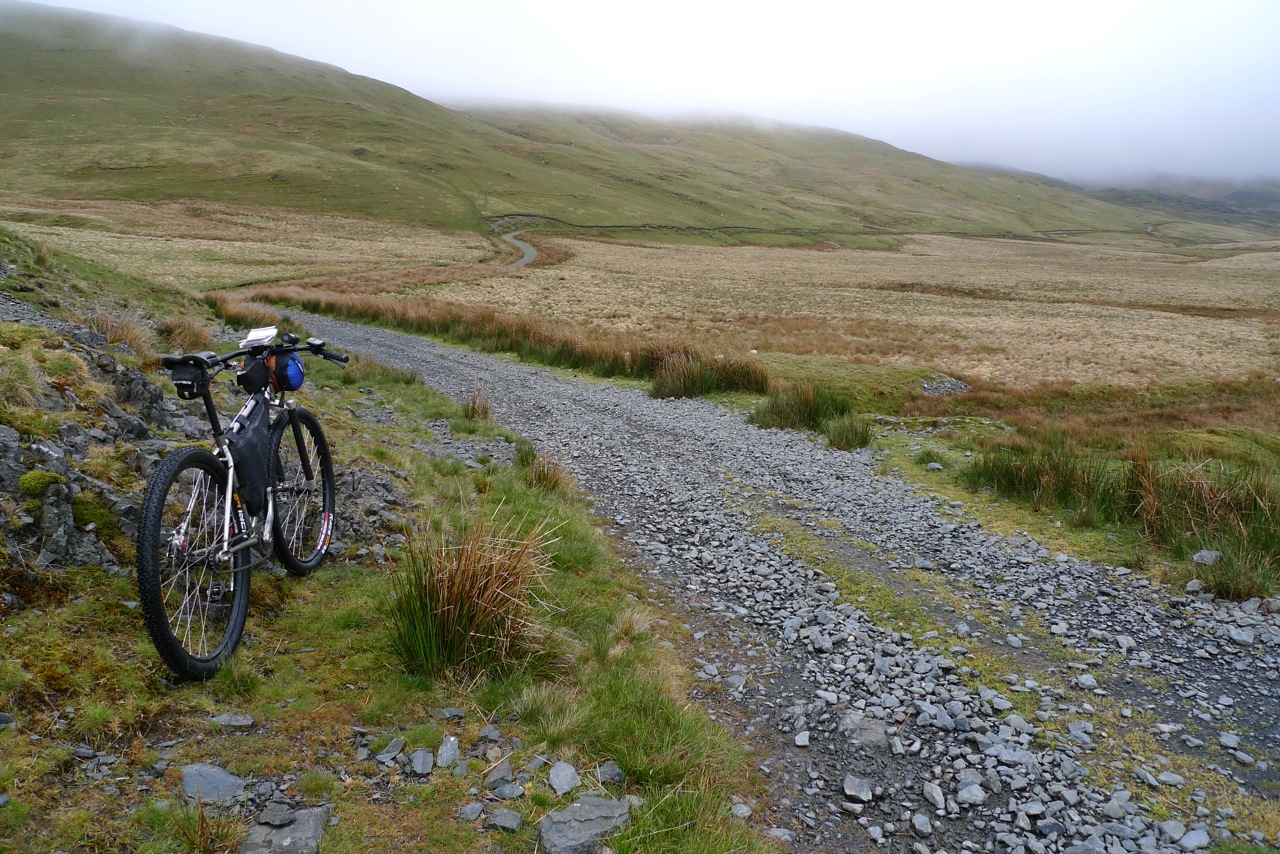
I’ve found myself doing a bit of bikepacking lately, and there are four trips that have yet to grace these pages. Running beside all that are some little make-you-own-gear (MYOG) projects that I want to share, and of course some pictures. I like pictures.
Maen Madoc
So, anyway, this post is something of a trailer for the tales of high endeavour and excitement to follow soon:
braving deep snow with a half-fat Pegasus in November
braving minus 10 degrees Celsius in a bivi bag in December
braving driving Welsh rain and high winds under a tarp in February
making a cool and effective wind shield during the cold, dark evenings
When I sat down to think about making a tarp, my train of thought went something like this:
Keep it as light weight as possible >> Using as little fabric as possible would help achieve this >> Using less fabric would keep the cost down >> If I use less fabric the packed volume will be less for any given fabric >> I should utilise the bike as a frame to pitch the tarp over to allow use in open areas if no tree cover available.
I came across some fabric that was silicon coated on both sides, was cheap and dark green. Having looked at numerous tarp set ups including some that used a bike as a frame, I worked out that I could use the wheels at either end of the tarp would use least fabric. I lay down to work out how much horizontal room I needed if I lay full length between each wheel. Being of average height, 2m was enough. I then figured that a 50cm flap over the wheel to a guy point would probably be sufficient.
I ordered 3m of fabric, 1.5m wide. When I arrived, it measured 3.10m by 1.57m, which was a bit of a bonus in both directions I thought. It was soft, handled quite well and wasn’t particularly noisy when you flapped it about, like some spinnakers are. The fabric weighed 398g, which converted to a weight of 2.4 ounces per square yard. This gave me a comparison to other fabrics like ultrasil/ silnylon, which are typically 1.1-1.3 oz/sq.yd.
The next step was to determine the shape the fabric needed to be when stretched over a wheel. With more time and a lot of thought, we could have gone to the trouble of stitching in tapered sections to allow a better fit over the wheel, but we decided against this in order to keep it simple. The obvious areas of excess fabric were going to the back corners, away from the front edge where the wheel was. We cut off two triangular pieces about 50cm by 75cm which gave us some extra fabric to reinforce the guy points. All the edge seams were folded over twice and double stitched. Some sections that were going to be under greatest tension were also reinforced with some gross-grain tape into the hem, with small loops at the ends to tie the guys to. We also stitched in a line of gross-grain between the front and back guy points, in line with the wheels for extra strength and added durability over an obvious contact point (the wheel).
Solo bike tarp
The finished product seems quite good. Though it’s not been out of the back garden yet, it was easy to erect and easy to get a good even tension. There are eight guy points which go out to six (titanium) peg locations. I’ve got 2.1m between each of the wheels, taking the extra 10cm of material supplied to give me more internal space.
Side taper detail
The rear tapered section where we took a triangle of fabric off didn’t work as envisaged, but instead allowed a sort of drop down at the back which would be more effective at keeping weather from coming under the edges. The fabric does go over the wheel quite well and does appear to have equalised the tension in the fabric very well without a lot of very tight or very slack areas of fabric.
Final weight, with guys, pegs and stuff sack
The guy lines were 1.5mm dyneema (15m, total) which is nice and light, easy to handle and knot. For further ease of tensioning, I’ve used mini line-loks which are hugely effective and weigh hardly anything. The whole lot stuffed easily into a Size 1 Granite Gear air bag to tip the scales at just over 480g, with six titanium pegs. Now I just need to find an occasion to test it out for real 😉
… or at least it will be with a bit of work with the sewing machine.
"Are you sure it's not a trap?"
Material is 80g/m2 ripstop nylon silicon coated both sides, just over £4.00/m. I’ve also got 15 metres of 1.5mm dyneema and a packet of mini line-loks to go with it. It’s going to be a solo bike specific tarp using the wheels as a frame for a cost of less than £30. More to follow next week…
While the rains pours down outside, it seems like a good opportunity to sit down inside and plan my next overnight excursion. Whilst looking for nice two day routes from Brecon, it is also an opportunity to review the gear I took with me for the Welsh Ride Thing. So, for the benefit of the curious:
Gear ready for packing
Sleeping bag – Rab Quantum 200, stuffed into a POD compression drybag, with homemade handlebar strapping system. I was really pleased with how well this worked. Everything stayed nice and tight after a few adjustments early on, and the dry bag did its job despite some poor weather.
Tent – Terra Nova Laser Photon stuffed into a Granite Gear No. 1 stuff sack.
Sleeping mat – Thermarest Neolite short. A comfy, if slightly noisy, compact and lightweight mat.
Stove – Vargo Triad – titanium meths stove; 100ml of methylated spirit (enough for two days), homemade stove base and wind shield. This worked well, easily boiling the water for me to re-hydrate my Expedition Food meals.
Pan – Tibetan Titanium 550ml pan with wire handle. Capacity to hold enough water for a meal or large drink, small enough to fit nicely over the end of the tent.
Misc – Black Diamond Ion head torch, first aid kit, survival bag, waterproof trousers.
Food – Expedition Foods dehydrated meals, some flapjack bars, small bar of chocolate and some chocolate coated coffee beans. Do apricot flapjacks count towards one of your five a day?
The bag into which it all fits
The frame bag is lovingly stitched together by Beth from 2oz denier coated fabric, with a waterproof zip, good thread and 2in wide velcro to keep it snug within the main triangle and sealed with seam grip to keep out as much water as possible. Overall cost about £15. Weighs only 87g. This is the second version Beth has made, with a few improvements over the first version in terms of width, zip design and stitching the straps in with the main seams. The fabric, whilst light, is not likely to be as durable as a 4oz fabric, so a third version is likely to be required at some point.
In terms of somewhere to go, I’m inclined towards the area around Llyn Brianne, via Mynydd Eppynt. I’ve not ridden Doethie Valley at all this year, which is one of my favourite pieces of trail in those parts.
The weekend of the Welsh Ride Thing still brings me out in a grin when I think about it.
Packed with memories of rain, wilderness, bothies, open fires, whisky, sunshine, singletrack, fireroad, river crossings and socialising with thirty odd like-minded riders who got together for a weekend of exploring the Big Welsh Wilderness.
Mountain track to Nant-y-moch
Claerddu Bothy
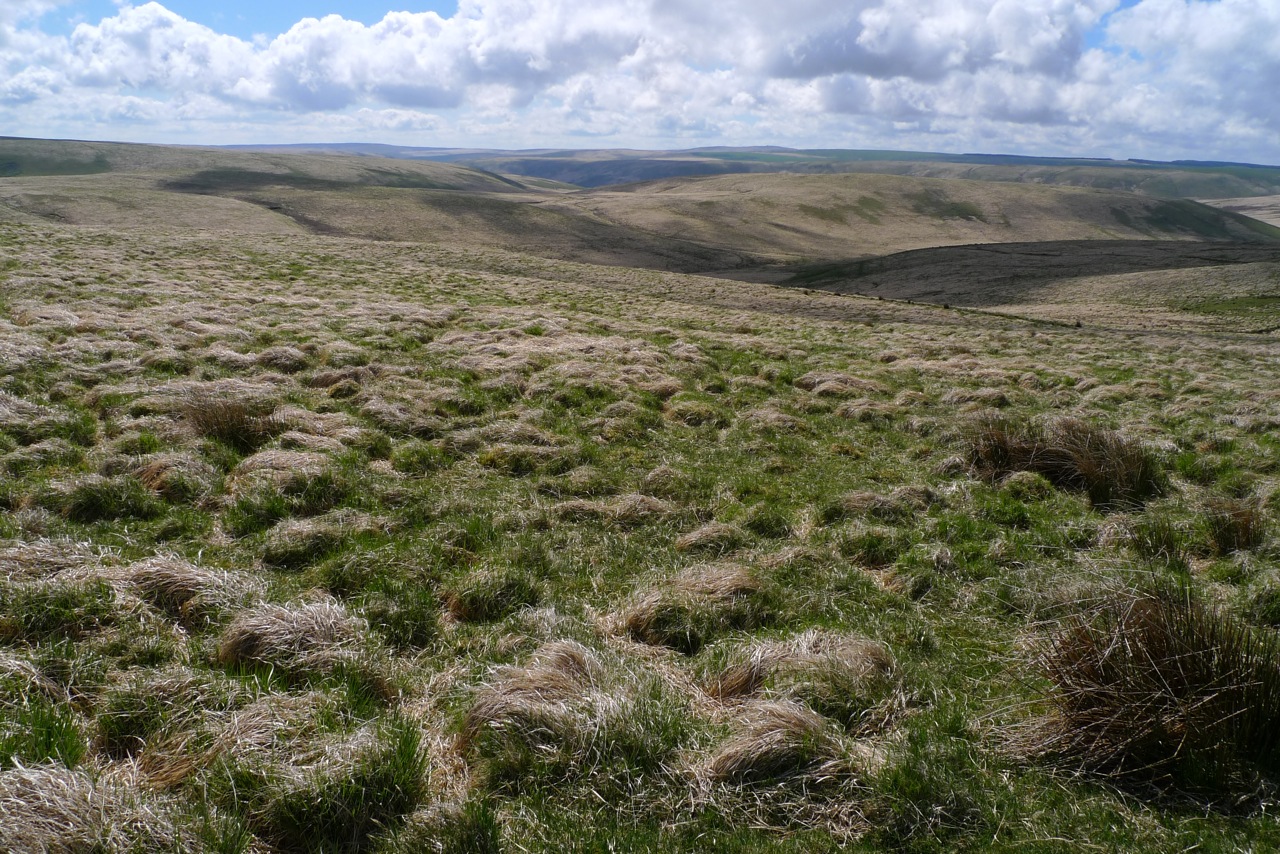
View from Monks Trod
Shadows mean sunshine
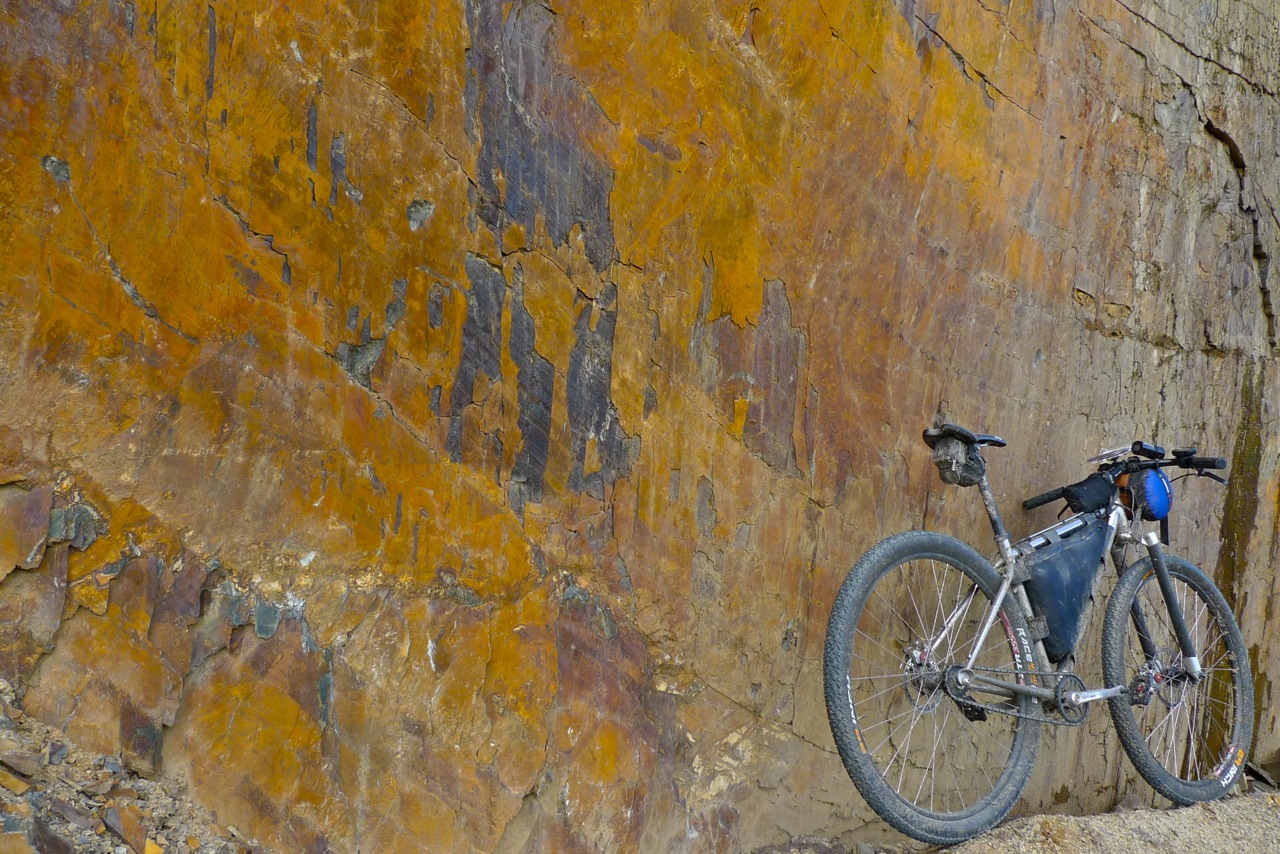
Quarried wall
Final descent to Pennant
Saturday’s rain wasn’t particularly heavy, but quite persistent. My choice of 32:20 gearing wasn’t quite as light as I would have liked, but any lower and the flat sections would have been tedious. My progress was slower than I had planned, a combination of weather, riding a loaded bike and hard (but enjoyable) trails. I chose to trim my route a little and headed for Claerddu – a remote bothy I’d not been to before.To my surprise, I was the only one there when I pulled up at 8pm. It concluded a 40 mile ride, which had taken in some great tracks, though not in the best conditions. I had enough time and light to get the fire going and cook up some food. Another WRT rider arrived at about 9pm, and we shared tales of the days riding.
Sunday dawned with patchy cloud and warm sunshine – a welcome change from the day before. I headed NE along Monks Trod, a route I am familiar with from previous exploits and one that can be either magnificent or miserable depending on the weather and/or the choice of line. Today, though, it was magnificent. An hour and half since leaving the bothy, I was back on the mountain road. A stiff climb lead me to Nant Rhys Bothy, before a long forest descent took me back into the valley to the north. Hafren Forest lay the other side a long winding climb through a broad valley bathed in sunshine. Hafren Forest was a delight to ride through. I seemed to miss all the singletrack, not really knowing the area, but instead stumbled upon a fantastic waterfall and the above pictured quarry with its iron tinged wall.
I rolled back into Pennant with another 40 miles ridden to conclude an excellent two days of riding. New trails, new people, new places and new inspiration to head out into the Welsh Wilderness some time soon. The whole weekend was a great departure from the normal riding I do, and a world apart from my previous racing endeavours. Check out all the pictures I took over the two days here.
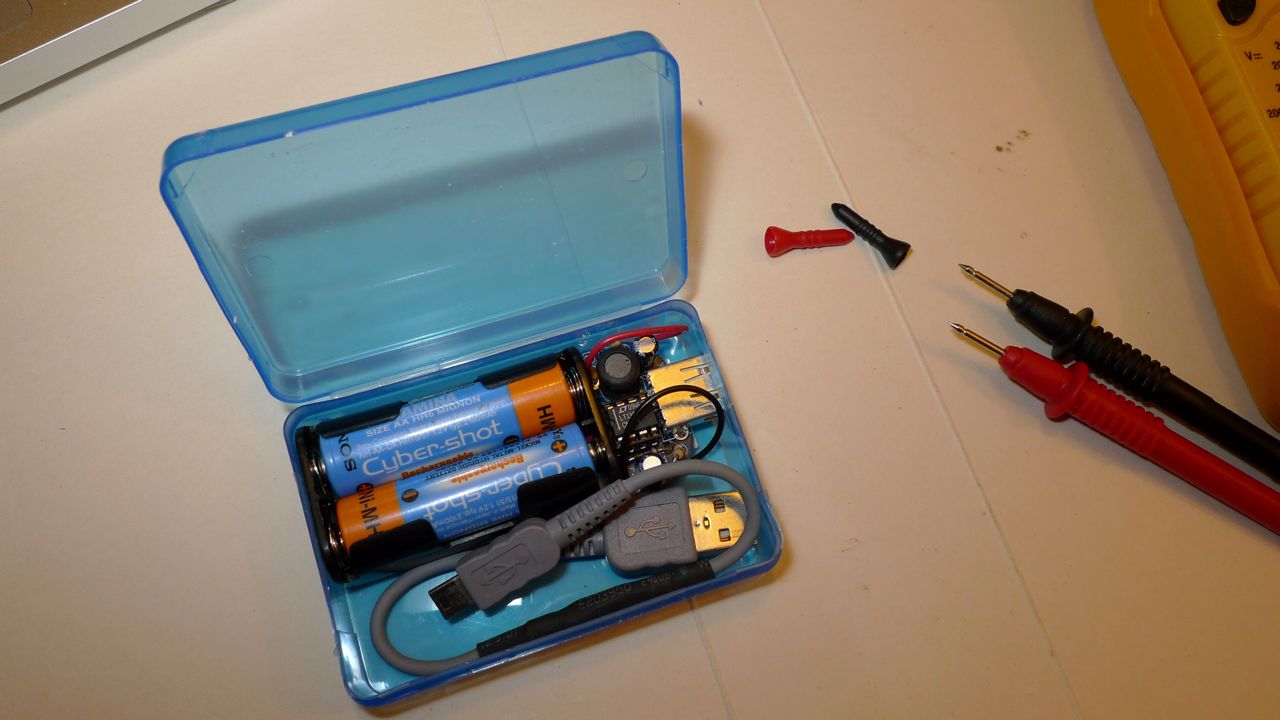
A while ago I did some research on recharging devices that charge via a USB connection (i.e. 5V DC) using the power from other batteries. Not having done any electronics since school, a simple approach was required that wouldn’t be too difficult to build. My first effort was based around a linear 5V regulator and a 9V PP3 battery. It worked, sort of… The problem was that it wasn’t very efficient. I would get about half a full charge from one battery, and the effects of reducing 9V to 5V produced a fair bit of heat. Most of these shortcomings stemmed from the limitations of the PP3 battery.
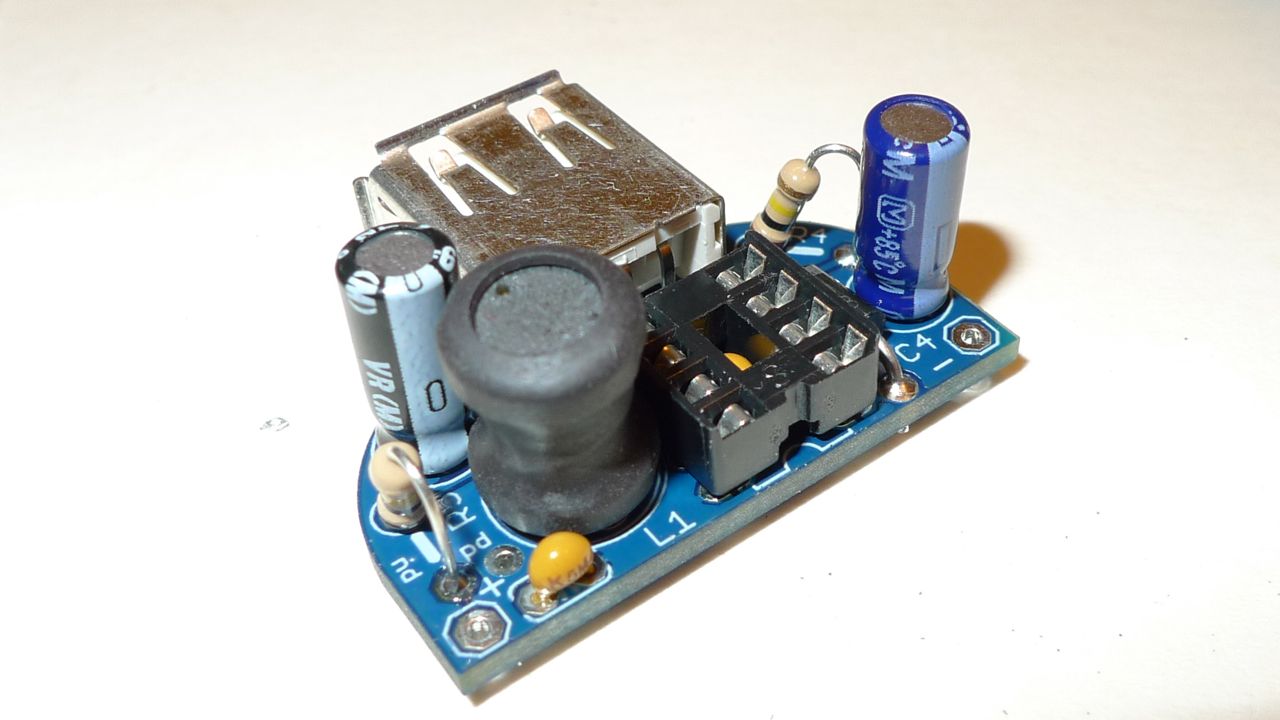
After further research, I found a neat device called the MintyBoost which was designed to boost two AA batteries (~3V) up to 5V. The capacities of AA batteries are much better than PP3 (less internal resistance and much higher mAh rating). At $20 for a DIY kit it looked a good solution to the problem and a bit of fun to build it.
On the left: this is what you get in the packet. The image in the middle is the result of 20 minutes work with a soldering iron, no swearing, burns to self or marks to the dining room table. On the right with all soldering complete, it fits neatly into a tubeless tyre repair kit box and gives me enough room for charging lead too.
So this kit will give me about two charges for my GPS from 2 AA alkaline batteries. It’s perfect for the short touring rides I have planned, or seeing as I can pick up AA’s in most small shops, it would be of use for much longer trips. It only weighs 87g too, so no serious weight penalty either.